Posts

Image
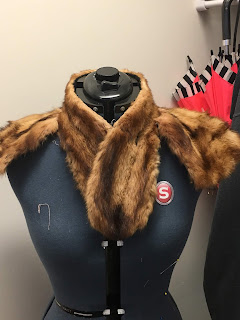
New Lining for an Old Fur Shrug **** Disclaimer**** I am against killing and trapping animals just for their fur I do believe in the philosophy of the Native Americans that  taught that when an animal is killed for food we honor its sacrifice by using all parts of it including the fur and bone. This  is a skin from an animal that died a hundred years ago, so there  should be no ill will towards those who wear vintage furs or furs  from  food animals that would have otherwise been thrown  out. (ex. rabbit) This beautiful fur piece was found on one of my recent Antiquing adventures with my dad. It as a mere $6 which  is a steal for anything vintage or fur. I think it is beaver but  hard to tell as it is not as course as most beaver that I have dealt with. It did need a bit of TLC but I love a challenge so  it was coming home to the dorm with me. The lining was completely gone with only the batting ...
Image
Butterick 6074 ★★★★☆ Skill: Intermediate Yardage: four yards of directional fabric  four yards lining.  Year : Regency pre-815 For this dress I decided to go with Butterick 6074 Dress view A. I have been rather obsessed with the regency era. It is almost a more satisfying era to sew as the dresses can be started and finished in a single day as opposed to a full 30-40 hours to complete an 1860's dress. I chose this pattern for the square neckline dress and the cute sleeve decoration. I actually followed the directions on this, my mom would be proud. The way it works is there is a fitted lining that is sewn to a gathered fashion fabric piece. While I read the instruction, I did not necessarily approve of how they did everything. The binding the pattern called for seemed unnecessary so I just didn't do it. The pattern also has too many open seams for my taste so I used a different technique for putting the lining and fashion fabric together.  ...
Image
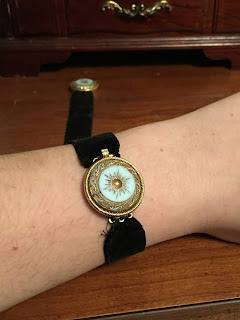
Tutorial For a Velvet Cuff Bracelet   Cost $30          Supplies:   13" length of 1" velvet ribbon $5 two box clasps $25 Step 1. measure your wrist and cut the ribbon that measurement minus the width of your clasp. I sewed the corners down on each side to create a v shape on each end to make it easier to mount to the clasp Step 2. Use a needle and thread to sew the ribbon and the clasp together, running the thread through the string holes on the clasp.  Step 3. Repeat with the other side. Cut your threads off and try it on.  May need a bit of tweaking to get it perfect for your measurements. Once you have one perfect, repeat with the other clasp and ribbon. These bracelets came in pairs, and were worn one on each side, and  it is very very rare to wear only one. 
Image
Late 1850's, Early 1860's Matching Velvet Bracelets Part I: A CSI of Victorian wrists I have been in need of a pair of bracelets for my ball ensemble for some time. There was a lovely pair for sale at an auction house with the 1860's tag. Absolutely gorgeous moonstones set against the blackest black of all velvets, barely touched from the century and half life it had had. And that's the moment I decided I needed a pair.    Now, just because the bracelet I had seen was dated to the era, did not mean that the date was correct or that it was something prevalent enough to reproduce and wear. I wanted proof that there was a bracelet with a box clasp and velvet band used during our era. There are a few different styles of terms used during the era making thins rather muddled, so lets start off with some terms.  WRISTLET A wristlet was a style that employed velvet ribbon, but they were bulky and had gathered velvet on a cotton band, and had a b...
Image
Sewing Box According to Beadle's Dime book Beadle and Dimes Guide to Dress-Making and Millinery, a multitude of chapters exist for helping any woman become her own seamstress. Think of it as the 1860's equivalent of a Dummy's Guide book series, it was meant to briefly touch on each topic without going super into depth, for each subject would be worthy of a book each, rather than a mere few paragraphs.  Of the many topics discussed in the book, one of the most practical is the Work-woman's Materials and Implements, the book discusses to as follows. The years have changed little to what a true industrious lady needs in her sewing box. The passage reads as follows        "A work-woman is not half prepared for her business ho is not  properly proceeded with tools and materials. It is embarrassing to to her to find herself without some essential but trifling article, at the moment she requires it for service;and it frequently causes not only the los...
Image
Pattern for  a Pinner Apron Cost: $10-$12 Two yards of cotton/wool fabric $8-$10 spool of thread $2 Pieces: 60" x 4" 60" x 36 12" x 26" Step one, cut out one strip of fabric around 4' wide.  Double this fabric over and sew the long side with the two edges Take the strip and turn it inside out so the seams are on the inside. Flip the two ends inside out and iron. Next step cut out the bib piece. 12" by 26" (or 13" in my case) fold over the fabric the long way making a box. Sew up the sides perpendicular to the folded side. Gather the raw edge to between 6"-8" The folded edge will serve as the top of your bib and the raw edge will be   sewn into the waistband. Based on how much coverage you want, the top side should measure around 12" wide.  Cut out another piece 60" by 36". When this piece is mounted, roughly the  horizontal side is 60...