TV Parisian Bustle Skirt Part 2 416
Poofy and Perfect
This skirt was a bit interesting, the mysterious bustle with its gravity defying witchcraft baffling my poor tiered hoop skirt era mind. What could cause these poofy magic? The secret is all in the tapes, and the rule of threes. Three tapes running vertically on the inside with three specific spots on the skirt that are attached to each tape. 
By attaching a piece of cloth onto these tapes, it can be arranged to create a poof and support from where these tapes are attached. just those little stitches are enough to support the skirt and create the bustling effect. there is also a drawstring running across under the bustle that is drawn tight to help also create the shape. The basic of a bustle is putting a lot of fabric in a little area so it is forced out and giving it lift, that's why a stiff fabric or lining is needed.
Another part of the skirt that I wanted to add was the pleated trim that is often seen on the bottom of period skirts, these dresses are from the Met Museum and show how the 1870's were not afraid of that bottom skirt trim


With such a gorgeous look, of course I just had to have it! But so much pleating and so little time! So I decided to pull out an old cheat that I learned from my boss at the sewing shop.

First step, find a piece of stiff cardboard as wide as you want the pleat

place it at the edge of the last pleat or at the starting point

Double fold over the fabric

Remove the piece of cardboard and sew down!

Now do this about 10,000 times and you have your trim! In my case I needed two and a half Miss Honey lengths of fabric. Yes she is biting the ruffles,what can I say, my dog has expensive tastes!
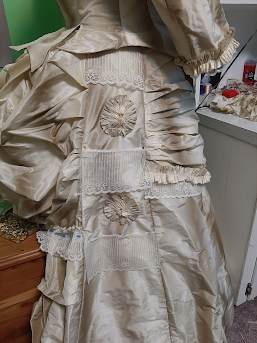
Hmmm, now the skirt is cute but this was the post war era of opulence, where looking like a walking frilly frosted cupcake was all the rage! The first bustle era was all lace, trim, layers and even more lace. So of course I just had to add something onto those boring side panels. I had used ruched trim and blonde lace on the front so in the spirit of continuity I added it to the side, and added the fun twist of "improvised ruched rosettes" or my IRR's. So I can look pretty and use pirate sounds!

First, I took a strip of silk, pinked the edges with my pinking machine, then gathered it. I took this long strip and ran it through the sewing machine. Next step was to cut it into about 6 inch pieces.

Then I took these six inch strips and sewed them into circles

Finally I flipped the top into the middle and the bottom. I ran a quick stitch through the center and tied it off so it would keep shape

Then I pinned the IRR's to the side panel and alternated it with pieces of the blonde lace. It just makes the dress so much more complete!

Phew that was a lot of sewing and trimming, but the dress is finally starting to come together! Can't wait to try it out one of these days out in the rose gardens, but first a bayaleuse and a trained petticoat


This looks amazing. I can't wait to see the final result. Keep up the good work.
ReplyDeleteThank you! Just happy to share the love and passion
Delete