An eyelet for an eyelet
Supplies:
40" of thread doubled over (3 cents)
a needle (20 cents)
awl ($6)
size 8 knitting needle ($3)
scissors
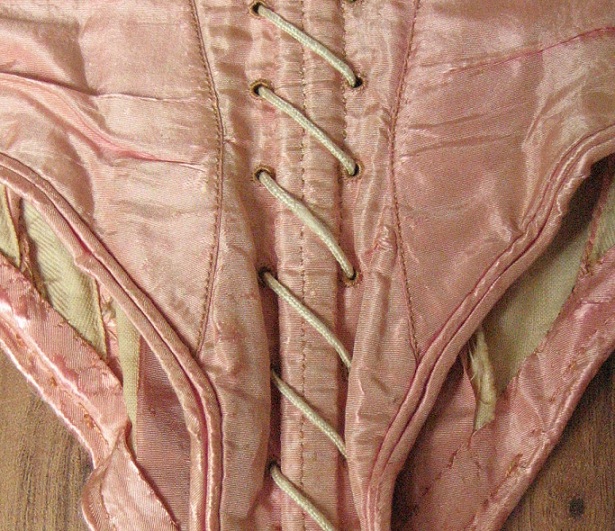
Before the days of the zipper, sewer and seamstresses had to get creative to get their clothes to stay on the body. During the 1860's, there were three main types outergarment closure: the button, hook and eye, and lacing. Lacing was the best for pulling an item tight and served not only to keep the garment on but was the most effective method for pulling garments tighter around the figure of the wearer. Eyelets and lacing can be seen most commonly on swiss waists, corsets, and ball gowns. It is most famously associated with corsets, lending to the style now even being referred to as "corset" closure even on outer garments and dresses. Done correctly, it is both pretty and functional.

An eyelet is basically embroidery around a hole in your fabric
to provide strength and keep the hole from fraying

first off the awl is used to puncture a hole in the fabric

The idea is to create the hole with the least amount of threads being broken
Work the awl into the hole until it can freely slide through the fabric


This is a cheat I like to use since the awls I have used are not normally large
enough to create a hole that will allow lacing to move freely through it. I simply
run the size 8 knitting needle through the hole. This step may not work with certain
fine fabrics such as silk without causing runs. If using silk, ignore using the
knitting needle.

The hole should now look like this. Time to get the thread out.

Take a forty inch piece of thread and double it over, creating a loop on one end
This will be what you use to "knot" your thread when you start sewing.

Before making any knots or tying off, run your needle into the hole
and reemerge about an 1/8 of an inch from the edge of your hole. Before
completely pulling the thread through the fabric, pull it through the loop
created from the end of the thread. You're making a "knot" around the 1/8"
of fabric.

This is where things get tricky.
You are going to put your needle back in through the eyehole and
reemerge right next to the thread already there. As you put your needle
partially through you're going to tuck it underneath your needle as
shown. Pull the needle through and the thread tight. Repeat.

Work your way around the circle. Each new stitch you make
should result in the thread coming out of the side away from the hole

Make sure each new stitch is reemerging right next to the previous one

If you make a mistake and there's a gap, no problem, just move go
back and throw a quick stitch there and then proceed.It should look
something like this. When the circle is complete you want to take your
needle straight through the fabric near the end of your last stitch,
so the needle is now on the bottom side.

The bottom of your fabric may not be the prettiest but as long as
it holds its fine. You can now knot the thread and cut it off.

It should look somethings like this! You have completed your first
handsewn eyelet and can cut the excess thread off. The
first few times you do this it may take half an hour or so, but
with practice it may take between 5-10 minutes. By the time you've done
a couple of garments you will definitely be faster! general rule of thumb
is 1" to 1.5" between eyelets on each side. Remember most of all, have fun!


Comments
Post a Comment